
What You Need to Know Before Diamond Grinding Your Garage Floor
Diamond grinding a garage floor is the process of using a rotating machine fitted with industrial diamond segments to mechanically abrade the top layer of concrete, creating a clean, porous surface that coatings like epoxy can bond to permanently.
Here’s the quick version of how it works:
- Clean the floor – Remove oil, grease, and debris
- Test for sealers – Do a water-drop test; if water beads, a sealer is present
- Grind the surface – Use a diamond grinder in slow, overlapping passes
- Vacuum debris – Clear all dust and slurry between passes
- Inspect the profile – Look for a uniform, matte, slightly rough texture (CSP 2-3)
- Fill cracks and patch – Repair any damage before coating
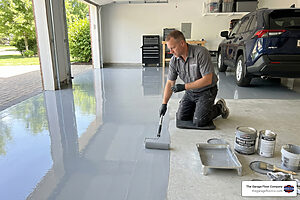
- Apply your coating – The ground surface is now ready for a proper mechanical bond
If you skip this step and go straight to epoxy, your coating will fail. It’s not a matter of if – it’s when.
Most homeowners find that a standard two-car garage (around 400 square feet) takes 1-2 hours to grind with the right equipment. The process removes roughly 1/8 inch of the concrete surface – enough to expose fresh, porous concrete without weakening the slab.
But getting it right takes more than just renting a machine and going at it. Worn rental tooling, wrong diamond bond types, poor dust control, and uneven passes are the most common reasons DIY grinding jobs go sideways.
I’m Jeff Gannon, owner of The Garage Floor Company, and after years of installing high-performance epoxy and polyaspartic coating systems, I’ve seen how proper diamond grinding garage floor prep is the single biggest factor separating a coating that lasts 15+ years from one that peels inside of two. In this guide, I’ll walk you through exactly how to do it right.

Why Diamond Grinding Garage Floor Surfaces is the Gold Standard
When we talk about preparing a floor for a lifetime of heavy use, we don’t settle for “good enough.” In professional flooring, diamond grinding garage floor surfaces is considered the gold standard for a reason. It provides a level of mechanical profiling that other methods simply can’t touch.
By using high-speed spinning diamond-tipped blades, the grinder creates friction that rubs down the concrete, removing imperfections, old stains, and “laitance”—that weak, milky layer of cement paste on the surface. This process results in a Concrete Surface Profile (CSP) of 2 to 3, which feels roughly like 60-grit sandpaper. This texture is the “anchor” your coating needs to stay put.

Superior Adhesion vs. Acid Etching
Many DIY kits suggest acid etching because it’s cheap and easy to ship in a box. However, we’ve seen countless failures from this method. Acid etching is an outdated technology that relies on a chemical reaction to open the pores of the concrete.
The problem? If your concrete is “tight” (highly troweled) or has an existing sealer, the acid can’t penetrate. Furthermore, acid etching introduces a massive amount of water into your slab. If that moisture doesn’t escape before you apply your epoxy, the coating will eventually blister and peel. Diamond grinding garage floor concrete is a dry process that removes the guesswork, ensuring the pH balance is neutral and the surface is perfectly porous.
Diamond Grinding vs. Shot Blasting
Shot blasting is another mechanical method where small steel beads are fired at the floor to chip away the surface. While effective for very thick industrial overlays (1/16 inch or thicker), it’s often too aggressive for residential garage floors.
Shot blasting can leave “corn row” patterns—visible lines from overlapping passes—that show through thin-film coatings. Diamond grinding, on the other hand, provides a much smoother, more uniform profile. It’s the ideal prep for our 2-day installation process, where we use a moisture vapor barrier epoxy basecoat followed by a high-performance polyaspartic topcoat.
| Feature | Acid Etching | Shot Blasting | Diamond Grinding |
|---|---|---|---|
| Method | Chemical | Impact (Steel Shot) | Abrasion (Diamonds) |
| Profile (CSP) | 0-1 (Inconsistent) | 3-5 (Aggressive) | 2-3 (Ideal) |
| Dust/Mess | Wet/Hazardous | Low (Vacuum) | Low (with HEPA Vacuum) |
| Reliability | Low | High | Very High |
| Best For | Porous, Bare Concrete | Thick Overlays | Epoxy & Polyaspartic |
For those interested in the long-term finish, you can learn more info about concrete polishing services which utilizes similar diamond technology but focuses on the final aesthetic shine rather than just preparation.
Essential Equipment and Diamond Tooling Selection
If you’re planning on a DIY diamond grinding garage floor project, your choice of equipment will make or break your weekend. Don’t just walk into a rental yard and ask for “the concrete thing.” You need to understand the mechanics.
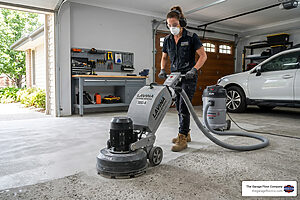
Professional-grade grinders are heavy—often weighing several hundred pounds—to provide the downforce needed to actually cut the concrete. For residential garages in places like Omaha or Phoenix, a planetary head grinder is the best choice. Unlike single-head machines that can “jump” or create swirl marks (sometimes called “Tornado Sketches” by frustrated DIYers), planetary grinders have multiple heads that rotate in opposite directions, keeping the machine stable and the floor level.
Selecting the Right Diamond Grinding Garage Floor Pads
The diamonds themselves are embedded in a metal or resin “bond.” This is where most people get confused. Here is the golden rule of diamond tooling: Hard bond for soft concrete, soft bond for hard concrete.
- Hard Concrete: Requires a soft metal bond. The bond wears away quickly to expose new, sharp diamonds to cut the tough surface.
- Soft Concrete: Requires a hard metal bond. If you use a soft bond on soft concrete, the diamonds will disappear in minutes, and you’ll be out of money and out of luck.
For a standard diamond grinding garage floor prep, we usually start with a 16-30 grit diamond. This is aggressive enough to remove most contaminants and create that necessary CSP 2-3 profile. If you’re looking for a smoother finish, you can follow up with a 50 or 80 grit pass. You can find more info about how to polish concrete if you want to dive deeper into the science of grit progression.
Dust Control and Safety Precautions
Concrete grinding creates a staggering amount of dust. This isn’t just “household” dust; it’s crystalline silica, which is hazardous if inhaled. According to OSHA safety guidelines, proper dust collection is mandatory for professional crews, and it should be for you, too.
Always use a grinder equipped with a dust shroud and connect it to a high-cfm HEPA vacuum. A standard shop-vac will clog in thirty seconds. Ensure you are wearing a fitted respirator (N95 or better), ear protection, and safety glasses. Following industry safety standards isn’t just about being “by the book”—it’s about making sure you can actually enjoy your new garage floor for years to come.
Step-by-Step Guide to Grinding Your Concrete
Ready to get to work? Whether you are in Cincinnati, Nashville, or right here in Omaha, the process for diamond grinding garage floor surfaces remains the same.
Preparing the Surface for a Diamond Grinding Garage Floor Project
Before the machine even touches the floor, you need to do a thorough inspection.
- The Water Test: Pour a few ounces of water on different areas of the floor. If it soaks in and turns the concrete dark, you’re good. If it beads up, you have a sealer or oil contamination that needs extra attention during the grind.
- Degreasing: Use a heavy-duty degreaser on any oil spots. While grinding removes the top layer, deep oil can sometimes “wick” back up and ruin your epoxy bond.
- Crack Filling: We recommend repairing cracks before your final grind pass. Using a high-quality concrete patch or even a two-part epoxy filler (some DIYers use Bondo in a pinch) ensures the floor is monolithic. Once the patch is cured, you grind it flush with the rest of the floor for a seamless look.
If you’re in the Ohio area, check out more info about Cincinnati concrete polishing for tips on local concrete conditions.
Handling Edges and Hard-to-Reach Corners
The big floor grinder is great for the center of the room, but it won’t get within two inches of your walls. For this, you’ll need a 7-inch handheld angle grinder equipped with a diamond cup wheel and a dust shroud.
Pro Tip: Do your edges first. It’s much easier to blend the main floor into your edges than the other way around. Be careful with handheld tools—they are aggressive and can easily gouge the floor if you don’t keep them moving in a steady, circular motion.
Common Pitfalls and Professional Tips
We’ve heard all the horror stories from homeowners in Indianapolis and Tempe who tried to DIY their diamond grinding garage floor prep. Here is how to avoid the most common mistakes.
Estimating Time and Material Removal
A typical two-car garage (400–500 sq. ft.) should take about 1 to 2 hours for the actual grinding phase if you have the right equipment. If you’ve been at it for four hours and the floor still looks shiny, your diamonds are likely “glazed over” or you’re using the wrong bond.
You should be removing about 1/8 inch of the surface. You’ll know you’re successful when the concrete looks uniform and matte, with no “shiny” spots left. Most diamond segments have wear indicators; if the metal is flush with the plate, it’s time to change them.
Real User Experiences and DIY Hacks
A challenge for DIYers is machine control. These machines have a lot of torque. If the machine starts to “walk” or pull, don’t fight it with your arms—use your body weight to guide it.
Lighting is Key: Use high-powered LED work lights placed low to the ground. This “raking light” will highlight any spots you missed or swirl marks that need to be smoothed out. If you’re in Tennessee, you can find more info about Nashville concrete polishing to see how the pros handle large-scale residential projects.
Frequently Asked Questions about Garage Floor Prep
Should I wet grind or dry grind my garage floor?
For garage floor coatings, dry grinding is almost always the better choice. Wet grinding creates a “slurry”—a thick, muddy mess that is difficult to dispose of and requires extensive drying time. Since we use a moisture vapor barrier epoxy base, we want the slab as dry as possible to ensure the best chemical bond. Dry grinding with a vacuum is cleaner and allows you to start coating immediately.
Can diamond grinding remove old paint or epoxy?
Yes! In fact, it’s the best way to do it. While chemicals can be messy and ineffective, diamond grinding garage floor surfaces will chew right through old, peeling epoxy or DIY paint. If the coating is particularly thick or gummy, you may need “PCD” (Polycrystalline Diamond) attachments, which scrape the coating off rather than just sanding it.
What surface profile (CSP) is best for epoxy?
For the high-performance systems we install—which include a moisture vapor barrier epoxy base and a polyaspartic topcoat—a CSP 2 to 3 is ideal. This provides enough “tooth” for the epoxy to bite into the concrete without requiring an excessive amount of material to level out the surface.
Achieving Professional Results with Diamond Grinding
At the end of the day, diamond grinding garage floor concrete is the foundation of a successful renovation. It’s the difference between a floor that looks great for a summer and a floor that looks like a professional showroom for decades.
At The Garage Floor Company, we take the stress out of the process. Our expert crews in Omaha, Lincoln, Phoenix, and beyond use professional-grade planetary grinders and HEPA dust extraction to prep your floor perfectly. We then apply our proprietary moisture vapor barrier epoxy basecoat and a UV-stable polyaspartic topcoat, all backed by our industry-leading 15-year warranty. Our 2-day process ensures you get your garage back quickly without sacrificing quality.
Ready to stop worrying about your concrete and start enjoying it? Contact us today for our professional garage flooring services and let us give your garage the upgrade it deserves!