
Is a Garage Floor Filler and Sealer Actually Worth It?
Garage floor filler and sealer products can protect your concrete from cracks, stains, and moisture — but not all options deliver the same results.
Here’s a quick answer based on your situation:
| Your Situation | Best Solution |
|---|---|
| Small hairline cracks | moisture vapor barrier epoxy and polyaspartic top coat crack filler + penetrating sealer |
| Oil stains, surface wear | Topical sealer or acrylic coating |
| Spalling, pitting, moisture problems | Professional epoxy moisture vapor barrier + polyaspartic topcoat |
| Hot tire damage, chemical exposure | High-performance polyaspartic coating system |
| Want long-term protection (15+ years) | Professional multi-layer coating system |
The short version: basic sealers protect lightly. For a floor that takes daily punishment from vehicles, road salt, and moisture, a professional-grade system is the better investment.
Your garage floor is one of the hardest-working surfaces in your home. It handles hot tires, oil drips, road salt, and constant foot traffic — yet most homeowners treat it as an afterthought until cracks appear or the surface starts to flake and stain.
The problem is that not all protection is equal. A basic sealer from the hardware store and a professional coating system are very different things, and choosing the wrong one can mean redoing the job in just a few years.
I’m Jeff Gannon, owner of The Garage Floor Company, and I’ve spent years installing high-performance epoxy and polyaspartic flooring systems — including proper garage floor filler and sealer applications — for homeowners and businesses who want results that actually last. This guide will help you cut through the confusion and make the right call for your floor.

Understanding Garage Floor Filler and Sealer Differences
When we talk about maintaining a garage, people often lump “fillers” and “sealers” into the same bucket. In reality, they perform two very different, though complementary, roles. Think of it like skincare: the filler is the “stitch” that fixes a cut, while the sealer is the “sunscreen” that protects the surface from future damage.
A garage floor filler is designed for structural or cosmetic repair. These are high-viscosity materials—often moisture vapor barrier epoxy and polyaspartic top coat menders or epoxy gels—used to bridge the gaps in your concrete. Whether you are dealing with a hairline fracture or deep pitting from years of road salt exposure, the filler’s job is to restore the floor to a level, continuous surface.
A garage floor sealer, on the other hand, is a protective layer applied over the entire slab. Its primary mission is surface protection. Depending on the type, it either soaks into the pores (penetrating) or sits on top (topical) to block oil, water, and chemicals from reaching the concrete.
| Feature | Garage Floor Filler | Garage Floor Sealer |
|---|---|---|
| Primary Purpose | Structural repair of cracks and pits | Surface protection and stain resistance |
| Application Area | Specific damaged spots | Entire floor surface |
| Material Type | moisture vapor barrier epoxy and polyaspartic top coat menders, epoxy gels, cementitious patches | Acrylics, silanes, epoxies, polyaspartics |
| Chemical Resistance | High (within the repair) | Variable (depends on coating type) |
| Moisture Handling | Fills voids | Blocks liquid or vapor (if high-grade) |
If you are dealing with significant water issues, you might need to look deeper into waterproofing services to ensure your repairs don’t just pop back out due to hydrostatic pressure.
Selecting a High-Performance Garage Floor Filler and Sealer
Not all products you find on the shelf at a big-box store are up to the task of a midwestern winter or a Phoenix summer. When we select a garage floor filler and sealer, we look for professional-grade specs.
For fillers, we prefer moisture vapor barrier epoxy and polyaspartic top coat menders. Why? Because they are “low viscosity” (thin enough to soak deep into the crack) but “fast cure” (hard enough to grind smooth in 15–30 minutes). They also offer better temperature tolerance; some professional systems can be applied in temperatures as low as -10°F or as high as 130°F.
For sealers, UV stability and VOC (Volatile Organic Compounds) levels are key. You don’t want a sealer that turns yellow the moment the sun hits it, nor do you want your house smelling like a chemical plant for a week. High-performance systems, like the ones we use at The Garage Floor Company, provide usable results in a single day, bypassing the 3–5 day wait times common with DIY kits.
When to Use Fillers vs. Sealers
You need a filler when you see:
- Spalling: When the top layer of concrete starts peeling or popping off.
- Pitting: Small holes caused by road salt “eating” the concrete.
- Cracks: Any separation in the slab that could allow moisture to seep through.
You need a sealer when you want:
- Oil Resistance: To prevent those permanent dark spots under the engine.
- Hot Tire Pickup Protection: To stop your tires from literally peeling the paint off the floor when you pull in.
- Dust Reduction: To stop the concrete from “chalking” and getting grey dust on everything in your garage.
If you’re staring at a spiderweb of lines on your floor right now, check out our guide on how to fix cracks in garage floor for a deeper dive into the mechanics of repair.
Penetrating vs. Topical: Understanding Your Protection Options
If you’ve ever seen water bead up on a concrete driveway like it’s a freshly waxed car, you’re looking at a sealer in action. But there are two very different ways to achieve that “bead.”

Basic Protection: Penetrating and Acrylic Sealers
Penetrating sealers (like silane siloxanes or densifiers) are the “invisible” option. They soak into the concrete, chemically reacting with the minerals to create a hydrophobic barrier inside the pores.
- Pros: They don’t change the look of the floor, they are “breathable” (allowing moisture vapor to escape), and they won’t peel.
- Cons: They provide almost zero impact or abrasion resistance. If you drop a wrench, the concrete can still chip.
Acrylic sealers are the “shiny” option. They form a thin film on the surface.
- Pros: They are cheap and provide a temporary gloss.
- Cons: They are notorious for failing. They wear away quickly in high-traffic areas and often require reapplication every 1–3 years. They are also highly susceptible to “hot tire pickup,” where the heat from your tires softens the acrylic and pulls it right off the floor.
Before you start any of these DIY projects, older garages might have lead-based paints. Always learn about lead safety during surface prep to keep your family safe.
Superior Protection: Professional Coating Systems
This is where we live. A professional system isn’t just a “sealer”—it’s a multi-layer armor for your floor.
At The Garage Floor Company, we use a proprietary system that starts with a moisture vapor barrier epoxy basecoat. This isn’t your average hardware store epoxy; it’s designed to “wick” into the concrete and stay there, even if there is moisture trying to push up from the ground. We then finish it with a polyaspartic topcoat.
This combination offers:
- Exceptional Abrasion Resistance: It’s roughly five times stronger than one-part epoxy.
- UV Stability: It won’t turn yellow or brittle in the sun.
- Decorative Appeal: We can broadcast vinyl flakes into the wet basecoat, giving you a showroom-quality look that also provides slip resistance.
The Professional Process for Long-Lasting Results
The secret to a floor that lasts 15 years versus a floor that lasts 15 months isn’t just the product—it’s the preparation. If you apply the world’s best garage floor filler and sealer to a dirty, smooth floor, it will peel. Period.
How to Apply a Garage Floor Filler and Sealer
If you want professional results, you have to follow a professional workflow:
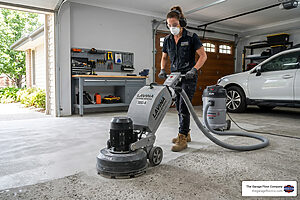
- Mechanical Grinding: We don’t use acid etching. Acid is dangerous, inconsistent, and doesn’t open the pores of the concrete deeply enough. We use industrial diamond grinders to remove the “laitance” (the weak top layer of concrete) and create a Concrete Surface Profile (CSP). This makes the concrete feel like 80-grit sandpaper, which is the perfect texture for a permanent bond.
- Dust Extraction: Grinding creates a lot of dust. We use HEPA-filtered vacuums to keep your garage (and lungs) clean.
- Crack Injection: We use a high-strength moisture vapor barrier epoxy and polyaspartic top coat filler to “stitch” cracks. We overfill them slightly and then grind them flush so they disappear under the coating.
- Moisture Testing: We use professional meters to check the moisture content of your slab. If the concrete is too wet, the coating won’t stick.
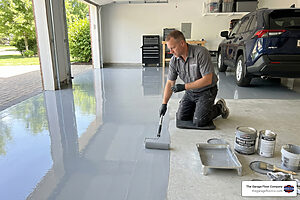
- Basecoat and Flake: We apply our moisture vapor barrier epoxy and broadcast the decorative flakes to refusal (meaning we cover every square inch).
- Topcoat: Once the base is cured, we scrape off the excess flakes and apply the clear polyaspartic topcoat.
If your floor is more than just cracked—if it’s actually tilting or uneven—you might be struggling with uneven concrete. Leveling is a different beast that should be handled before the sealing process begins.
For a more detailed DIY look, you can read our guide on how to apply epoxy with a non-skid finish.
The Importance of a Moisture Vapor Barrier
Most garage slabs were poured without a plastic vapor barrier underneath. This means moisture from the soil is constantly traveling up through the porous concrete.
When you put a standard sealer or cheap epoxy on top, that moisture gets trapped. Eventually, it builds up enough pressure to create osmotic blistering—those annoying little bubbles that eventually pop and peel.
Our system uses a specialized epoxy basecoat that acts as a moisture vapor barrier. It’s engineered to withstand that upward pressure, ensuring your floor stays bonded for the long haul.
Common Mistakes in Garage Floor Maintenance
We see a lot of “weekend warrior” projects gone wrong. Usually, it’s not because the homeowner isn’t handy; it’s because they were sold the wrong expectations by a product label.
The most common mistakes include:
- Improper Cleaning: You can’t just power wash the floor. Oil and grease act as bond-breakers. If you have stains, you need to know how to clean oil off garage floor properly using degreasers or mechanical means before applying a garage floor filler and sealer.
- Ignoring Humidity: Applying a coating when it’s too humid can cause the material to “blush” (turn cloudy) or fail to cure.
- Cutting Corners on Prep: Acid etching is the #1 cause of DIY failure. It doesn’t remove tire marks or deep sealers, leading to poor adhesion.
If you already have a floor and just want to keep it looking good, make sure to follow the proper aftercare and cleaning instructions to avoid damaging the finish with harsh chemicals.
Environmental Factors and Cure Times
Temperature and humidity are the “silent killers” of garage floor projects.
- Flash Drying: In places like Phoenix or Nashville in the summer, the concrete can be so hot that the sealer dries before it can level out, leaving unsightly roller marks.
- Delamination: If you apply a sealer in the morning when the dew point is high, you risk trapping moisture under the film, which leads to peeling later.
Professional installers have the advantage of using materials with “adjustable” cure rates, allowing us to get the job done right whether it’s a humid day in Cincinnati or a dry afternoon in Scottsdale.
Frequently Asked Questions
Can I seal my floor before applying epoxy?
Actually, you shouldn’t. Most penetrating sealers are designed to repel liquids. If you seal the floor first, the epoxy won’t be able to “wick” into the pores of the concrete, and it will peel right off. If you have an existing sealer, it must be mechanically ground off before a professional coating can be applied.
How long do professional fillers last?
When used as part of a complete system (grinding, filling, and coating), our moisture vapor barrier epoxy and polyaspartic top coat fillers are designed to last as long as the floor itself. Because they are protected by the topcoat and bonded deep into the concrete, they don’t pop out like cement-based patches often do.
Is a polyaspartic topcoat better than standard sealer?
In almost every measurable way, yes. A polyaspartic topcoat is thicker, more flexible, more chemical-resistant, and 100% UV stable. While a standard acrylic sealer might last 2 years, a polyaspartic system can easily last 15+ years with minimal maintenance.
Why Professional Coating Systems Outperform Sealers
At the end of the day, your garage is more than just a place to park—it’s an extension of your home. Whether you’re in Omaha, Lincoln, Phoenix, or any of our other locations, your floor deserves better than a temporary fix.
At The Garage Floor Company, we don’t believe in “good enough.” We use a premium epoxy basecoat with an integrated moisture vapor barrier and a crystal-clear, UV-stable polyaspartic topcoat. This isn’t just a garage floor filler and sealer; it’s a 15-year warranted transformation that makes your garage cleaner, safer, and more valuable.
Ready to stop worrying about cracks and stains? Transform your garage with our professional services and get a floor that’s actually worth the effort.